
Errata
Vampire: The Masquerade - CHAPTERS is a massive game that had a long period of development. Although we have fixed the majority of bugs and typos, some were still spotted after printing. We are sincerely sorry for the inconvenience this causes. We guarantee that these problems will be fixed with the next printing of the game. In the meantime, here is the list of minor errors, improvements and adjustments we have found. Feel free to use the form below if you find any in the game.
Last update: October 19th, 2023
Chapters
Prologues: Brujah
- † Booklet, E.7 – P.10
Potence level 1 gives extra dice to the attack, not directly Damage.
Prologues: Gangrel
- † Storybook: Introduction – P.5
The bottom note says to use only the character's base combat deck, but you can use all available combat cards to Aren, as seen in a table in the booklet. - † Booklet, E.8 and E.11– P.11 & 14
The skill in the description box should be ATHLETICS and not BRAWL, since the combat cards "LEAP" and "DODGE" use Athletics.
Prologues: Malkavian
- † Booklet, D.10 – P.15
The difficulty of the skill check should be 3 instead of 2.
Prologues: Toreador
- † Storybook – P.15
1) At the bottom of the page, add the instruction: "Take 3 Boons."
2) Do not set Investigation token #3 on the tile. It is setup later in the prologue.
Chapter #1
- ‡ Storybook: Introduction – P.29
The first action should not direct you to E.1 specifically (as it is Lucianna's page). It should read: Read your character's introduction. There are found on pages E.1 to E.8
Chapter #2
- † Machine room: front – P.103
When you investigate the crates, the two skill check results are inverted. It should read:
"MAKE A MENTAL + AWARENESS CHECK
0 TO 2 SUCCESSES: READ IN.2
3+ SUCCESSES: READ IN.1" - † Larry the Janitor: D.3, D.5, D.7, D.8 – P.44, 46, 48, 49
Larry the Janitor is never set on the tile, that is by design. The instruction to remove his standee from the tile should not be there, you can ignore it. - † Larry the Janitor: D.4 – P.45
Since Larry is never set up on the tile, you cannot run after him when he flees. Remove the following instruction:
"THE “LARRY THE JANITOR” NPC STARTS FLEEING. Catch him or risk a Masquerade Breach"
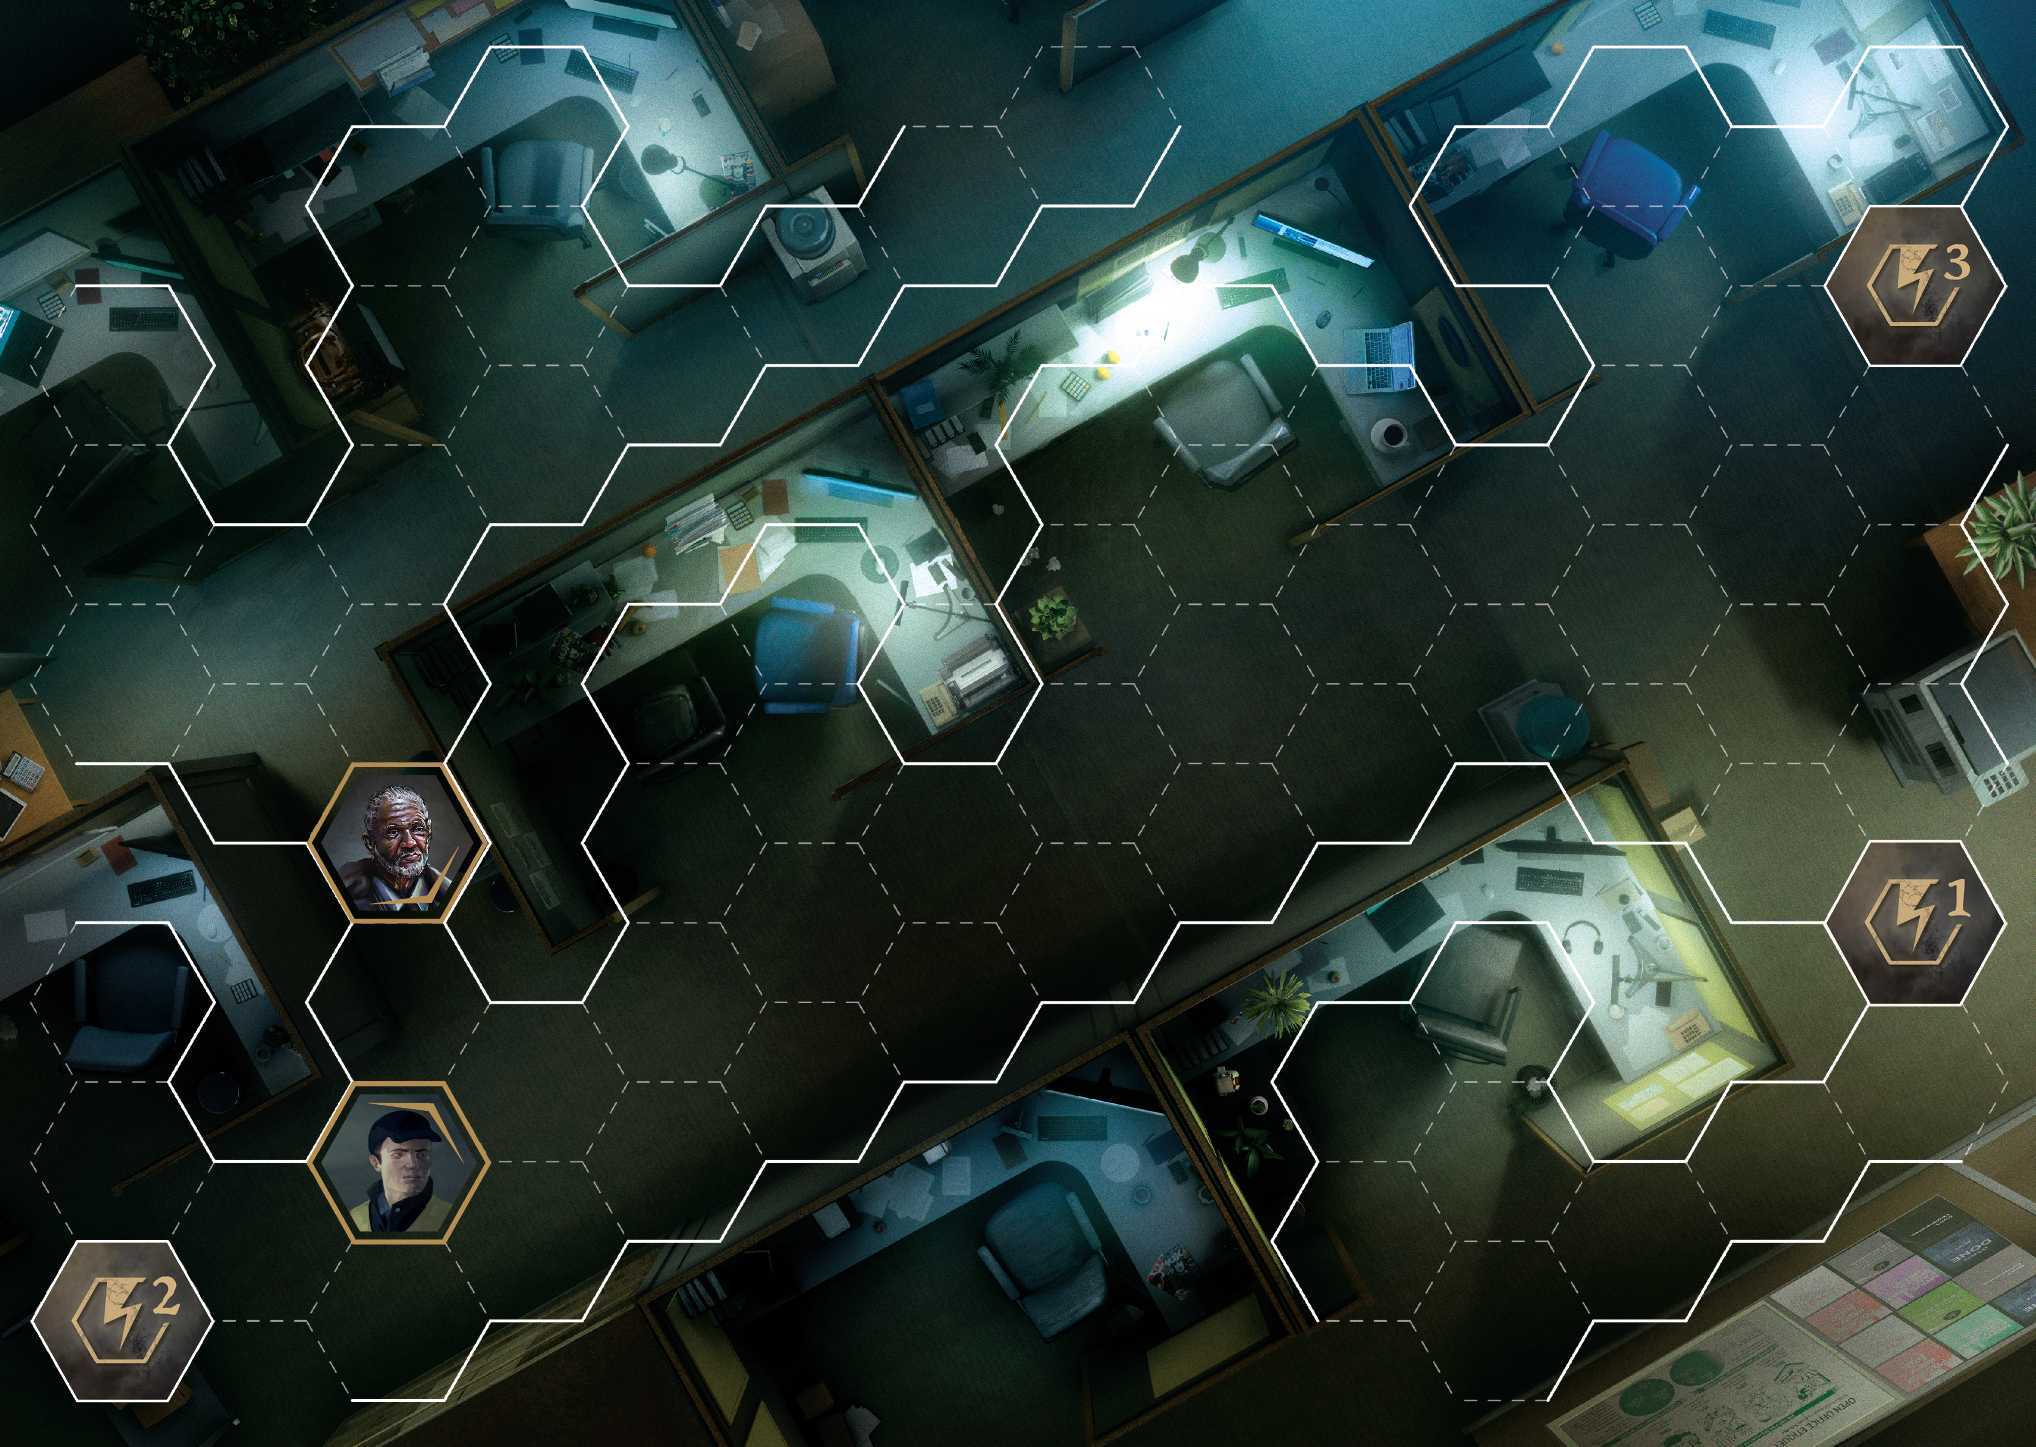
Chapter #5
- ‡ Storybook: Introduction – P.37
Add Action Token #3 on the HEX as shown in the image below.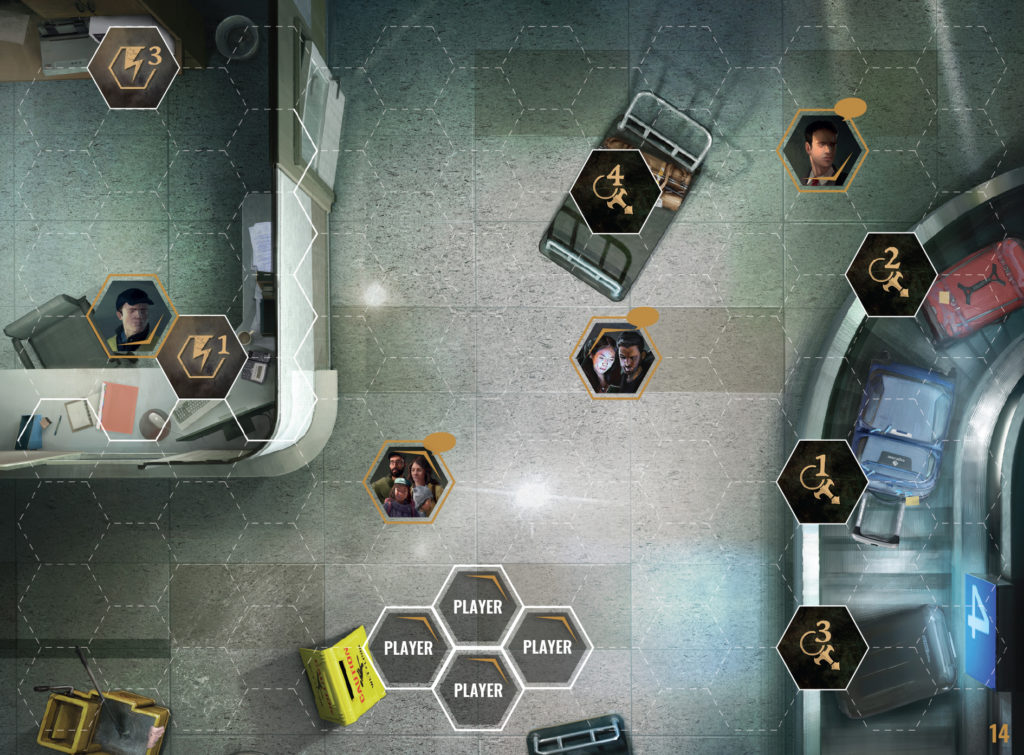
- † E.12 – P.77
In the first box, above "YOU MUST RESUME PLAYING", add the following instruction: "EXCHANGE INVESTIGATION AREA TOKEN #2 WITH ACTION TOKEN #2"
- † E.12 – P.77
In the second box, above "YOU MUST RESUME PLAYING" add the following instruction: "CHAPTER ENDS ONCE ACTION TOKEN #3 IS REMOVED FROM THE TILE"
Interlude 1
- † Storybook – P.43
The "SIDEQUEST ‒ ANCIENT PATHS N° 1: TO SMELL A RAT" is on page 129 and not 43.
Chapter #6
- † Storybook, Conclusion – P.40
As part of the rewards for finishing the chapter, add: “TAKE THE FIRST KEY FRAGMENT #54” ITEM CARD”.
Chapter #7
- † Table of Contents
At the bottom of the Table of contents, add the following instruction: "ACTION TOKEN #1…P.66". The page exists, but the link to it in the Table of contents is missing.
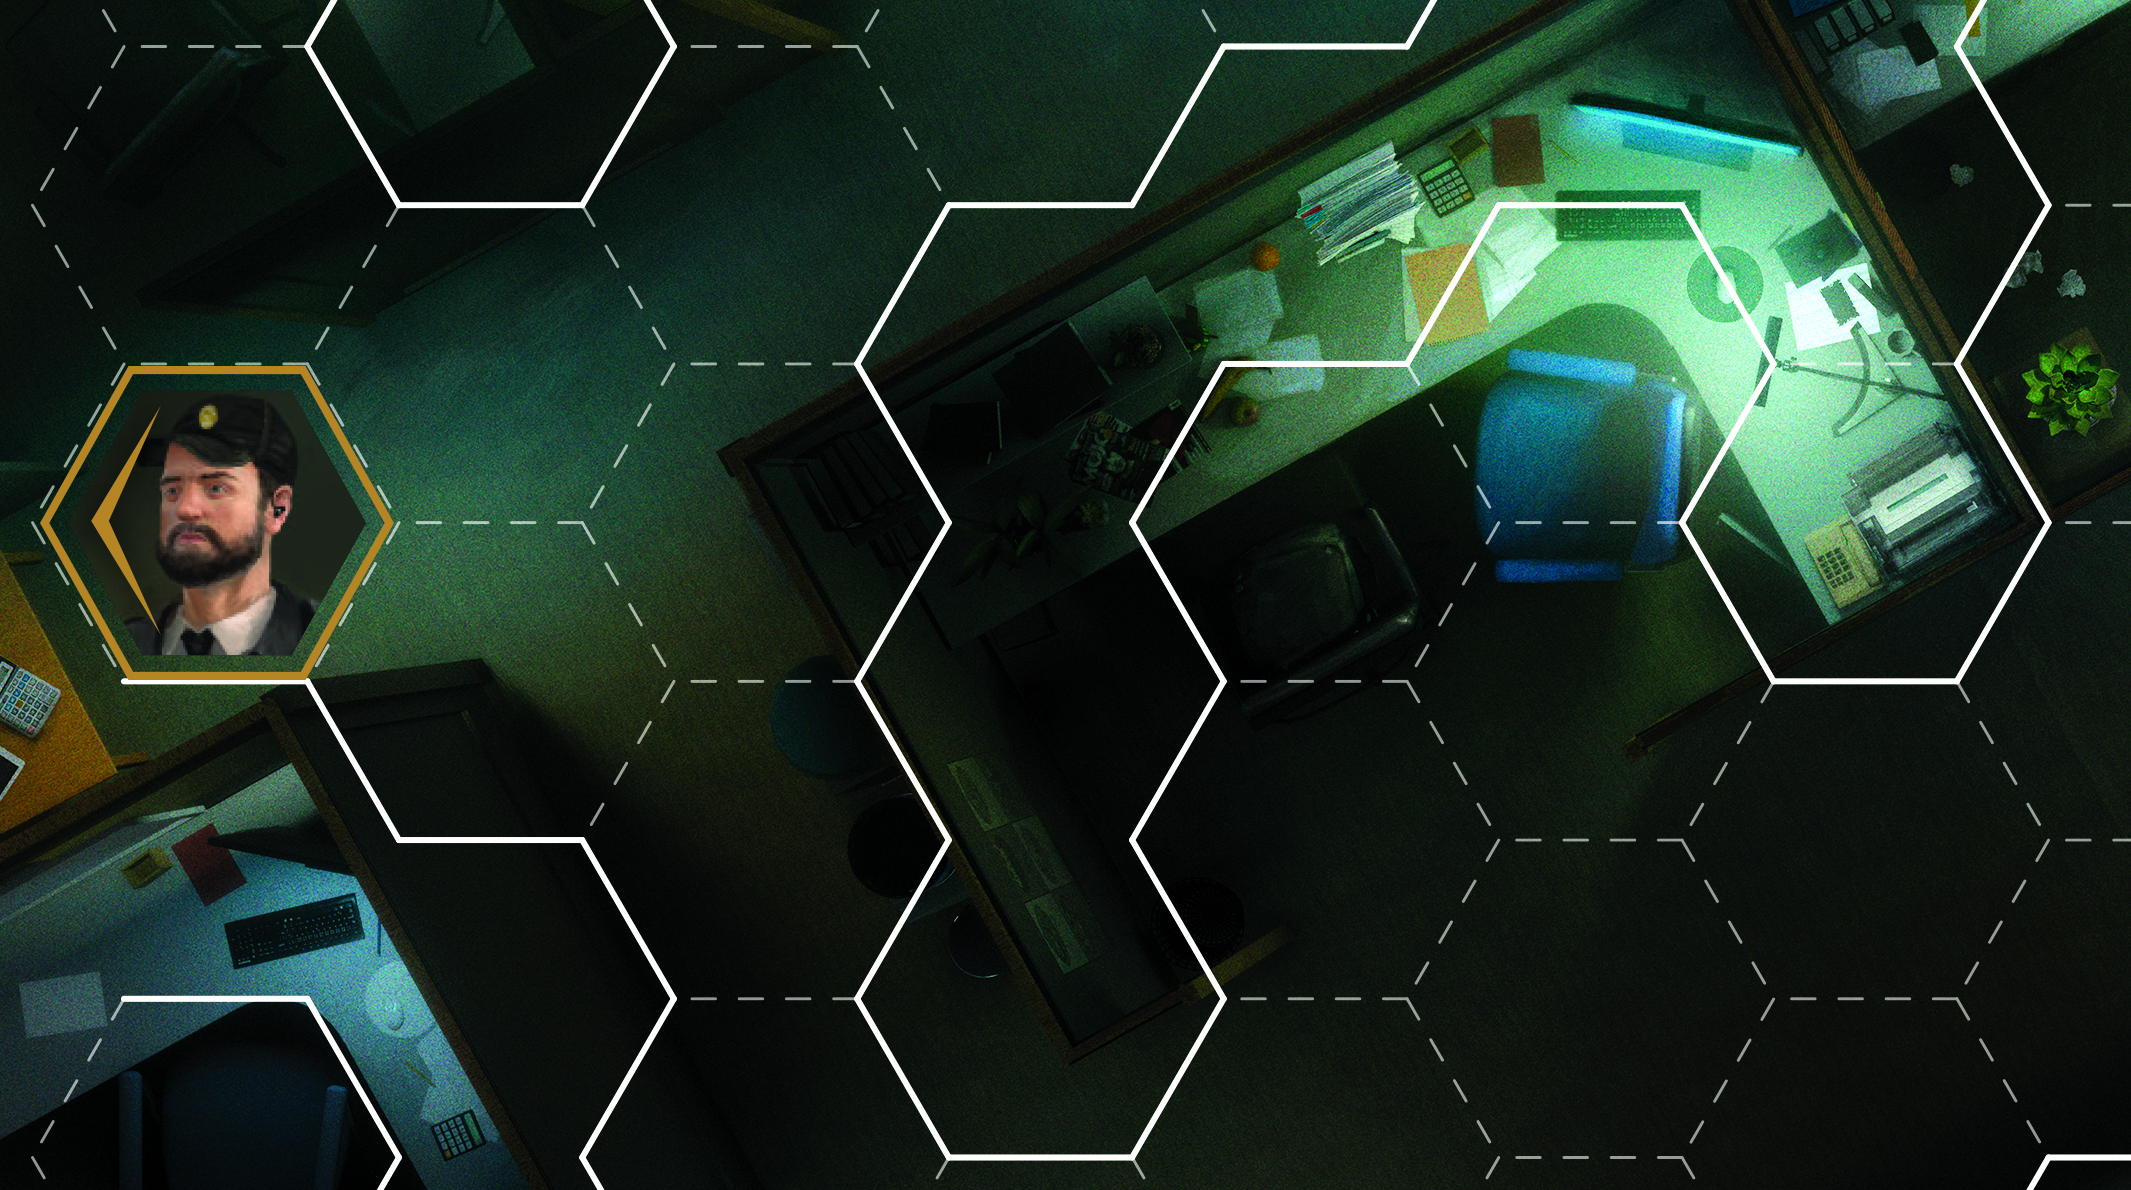
- ‡ Storybook: Introduction – P.45
Place ACTION TOKEN #1 on the HEX shown below. remove the "STUDENTS" and "SECURITY GUARD" NPCs. They appear later in the chapter.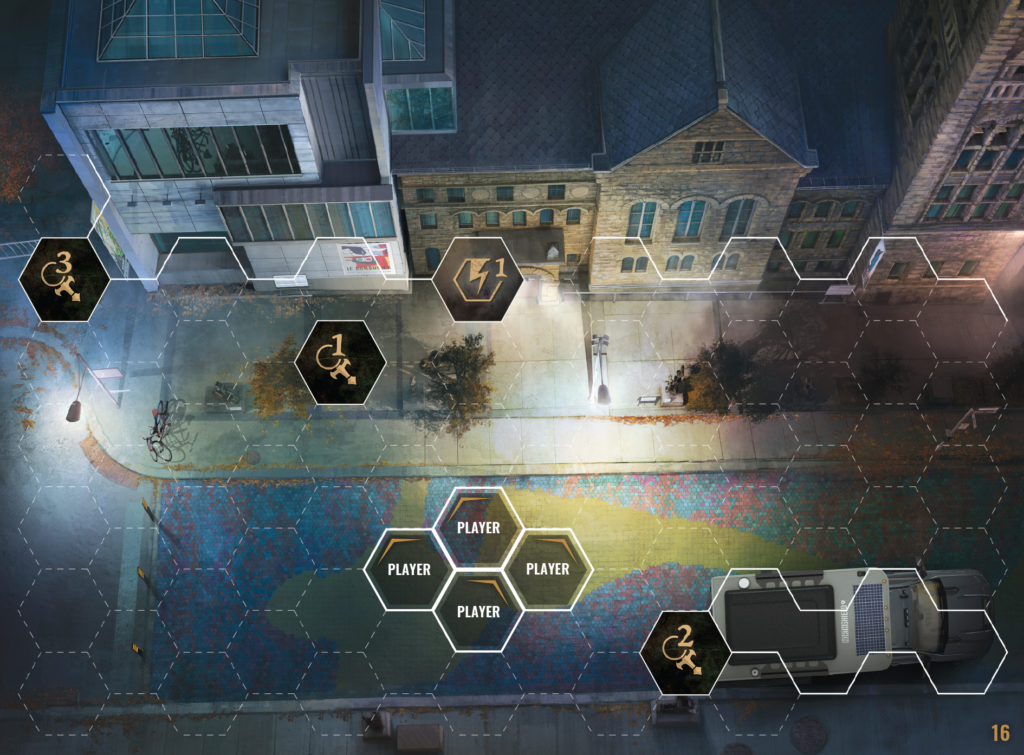
- † E.2 – P.63
The "STUDENTS" NPC is indeed a dialogue NPC, and the image shown on the page should have the speech bubble to indicate that.
- † E.4 – P.65
Add this instruction if you win combat: "REMOVE INVESTIGATION AREA TOKEN #2 FROM THE TILE". - ‡ E.5 – P.66
The first choice should be “IF YOU HAVE CLUE TOKEN #4” and not “#1”, as it currently is.
Chapter #8
- ‡ Storybook, Introduction – P.47
The action should read: "READ PAGE E.37", and not "READ PAGE E.1".
- † Table of Contents
Page 64 is for Action token phase I, while page 65 is for Action token phase II. When it is first setup on the tile, the action token is in phase I. Later during the scenario, it can, through your actions turn to phase II. - † IN.3 & IN.7 – P.52 & 56
The Action token is setup in phase II this time, so interacting with it triggers E.6.
Chapter #10
- † E.8 – P.73
The "COUPLE" NPC is indeed a dialogue NPC, and the image shown on the page should have the speech bubble to indicate that. - † FD.2 and FD.3 – P.59-60
Replace all mentions of "READ PAGE FD.4" with "READ PAGE FD.6" and vice versa. The page numbers were linked to the wrong branch.
Chapter #11
- † Storybook – P.53
The following NPCs should also have a speech bubble, as they are dialogue NPCs as well as being combat ready: Rookie Guard #50, Distracted Guard #37, Older Guard #48, Tough-looking Guard #47, Overworked Guard #9. - † E.17 – P.114
The third choice should be: “IF YOU HAVE BOTH CLUE TOKEN #2 AND THE SECOND KEY FRAGMENT #55 ITEM CARDS”
Chapter #12
- ‡ Table of Contents
The table is missing the reference to phase 2 of ACTION TOKEN #2. At the bottom of the table of content, add the following: "ACTION TOKEN #2 (PHASE 2).......p.109" - † E.12 – P.113
Add the following instruction before "RESUME PLAYING": "DISCARD THE 'MORE THAN YOU BARGAINED FOR' #78 EFFECT CARD" - † E.110 – P.211
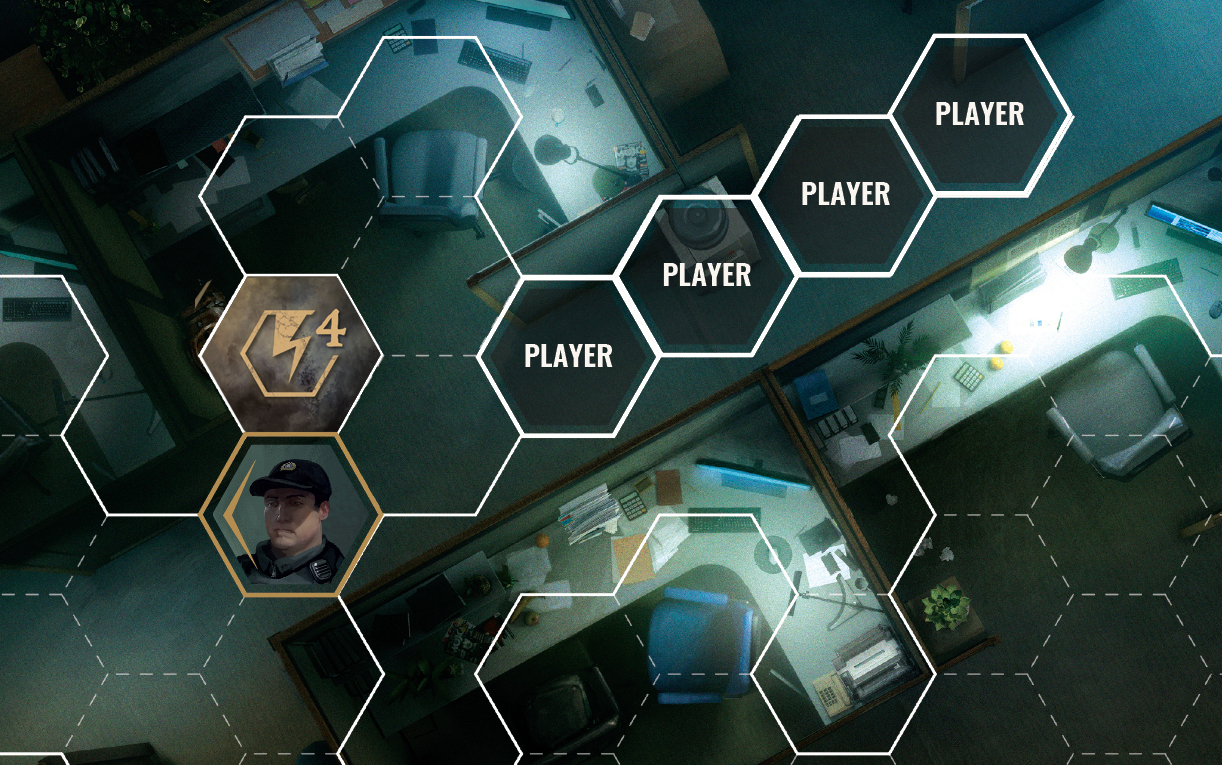
The standee numbers are missing. The instruction should read: "SET THE 'GUEST #1' #38 NPC, THE 'LINDA' #51 NPC, THE 'MARIE DUMONT' #36 NPC, THE 'ROOKIE GUARD' #50 NPC, AND THE 'TOUGH-LOOKING GUARD' #47 NPC ON THE DESIGNATED HEXES". - † E.115 – P.216
The standee numbers are #47 for the Tough-Looking Guard NPC, and #50 for the Rookie Guard NPC. - ‡ E.116 – P.217
The "ACTION TOKEN #2" that is being setup here is ACTION TOKEN #2 (PHASE 2), which leads to page E.8 when activated.
Chapter #13
- † Table of Contents
Pages were inverted in the Table of contents. "Tough-Looking Guard" is on page 5, and the "Old Guard" on page 19. - † Sam: D.3 – P.80
Remove the "IF YOU HAVE HUMANITY 7" from the second choice. Anyone can take that choice.
Chapter #14
- † Valois Sang: D.1 – P.64
Add the following instruction at the bottom of the page: "Otherwise, RESUME PLAYING" - † Yuma McKenzie: D.3 – P.20
Remove the "THE “YUMA MCKENZIE” NPC CAN NO LONGER BE INTERACTED WITH" instruction. It should not appear on this page. - ‡ Storybook: Conclusion – P.60
At the bottom of the page, add the following instruction:
"If you own the HECATA EXPANSION PACK, the HECATA character becomes playable. You may play the HECATA – CHAPTER N°1 at the end of any CHAPTERS."
You can play Aurora at any point in the campaign, but this is the moment in the narrative when she appears in Montreal. From this chapter onwards, you will see Aurora-specific choices in the game. - † Storybook: Introduction – P.59
The "WILLIAM" NPC is not a dialogue NPC. Ignore the speech bubble on his set up icon. - † E.7 – P.98
When you fail the combat, you may restart the chapter from E.30, not E.28.
Chapter #15
- † Mirrors: IN.1 – P.5
When you investigate the mirrors, the two skill check results are inverted. It should read:
"MAKE A MENTAL + OCCULT CHECK
0 TO 2 SUCCESSES: READ IN.1
3+ SUCCESSES: READ IN.2" - ‡ E.11 – P.54
The instruction for the second choice should be "READ FINAL DEDUCTION PAGE FD.3" - † E.18 – P.61
Add the following instruction at the bottom of the page: "TAKE THE "THIRD KEY FRAGMENT" #56 ITEM CARD" - ‡ Tiles: IN.2 – P.31
A potentially chapter stopping instruction is missing. Add the following instruction at the bottom of the page: "IF ALL INVESTIGATION AREA TOKENS HAVE BEEN REMOVED FROM THE TILE YOU MUST READ EVENT E.2"
Chapter #16
- ‡ Storybook: Introduction – P.63
At the bottom of the page, a callout is missing. It should contain the following special rules for Chapter 16:
- At the end of the first round, READ EVENT PAGE E.3.
- You cannot interact with the action tokens in this chapter. The "SCARED YOUNG COUPLE" NPC counts as the "MOST INJURED" for the purposes of targeting in combat. The "DECREPIT RISEN DEAD" NPCs move 1 HEX per turn towards the couple.
- The "DECREPIT RISEN DEAD" NPCs use the "DECREPIT RISEN DEAD" summon card.
- The "SHAMBLING RISEN DEAD" NPC uses the "SHAMBLING RISEN DEAD" state card.
- Remove the "BITE" card from your combat deck for this chapter. Biting the dead is a bad idea.
- You can run away and end this chapter at the end of any combat round. When you do so, READ EVENT PAGE E.2
Chapter #18
- † E.23 – P.124
Add the following instruction after the "IF THE ROUND TRACKER HAS REACHED 0...": "REMOVE THE ROUND TRACKER". If the round tracker has not reached 0 by then, there is no need for it anymore. -
† Front Stage IN.3 – P.62
If a combat begins, the security guards use the following state cards: “1st Security Guard #10, 2nd Security Guard #36, and 3rd Security Guard #37”. -
‡ South Dial, IN.2-3-4 – P.75-76-77
Add the following Instruction before the “Resume Playing”: “IF THE INVESTIGATION AREA TOKEN #3 IS NOT ON THE TILE, YOU MUST READ EVENT E.26”.
Interlude #2
-
† Storybook – P.70
The gold bar at the top contains the wrong item number. It should read: “FRAGMENTED SOUL IN A MIRROR” #57. -
† Storybook – P.73
An instruction is missing. At the end of the interlude, you should see the following instruction: “YOU CAN NOW PLAY THE MINISTRY CHARACTER AND PLAY MELISSA SANTOS’ CHAPTERS”.
Chapter #19
-
† D.12, D.15 et D.21 – P.53, 56, 62
These pages do not indicate which State card to use. They should be:
De Facto Supervisor: Construction Boss #39
Disinterested Worker: 1st Construction Worker #40
Engineer: 2nd construction Worker #41 -
† E.23 – P.150
The token number is wrong on the image. It should be Action Token #2. The instructions are correct. -
† Barred Pipe IN.12 – P.77
An instruction is missing in order to avoid a loop. Before the instruction to read Andrade's dialogue, add the following: "REMOVE INVESTIGATION AREA TOKEN #1 FROM THE TILE". -
† Opened Pipe IN.7 – P.102
An instruction is missing in order to avoid a loop. Before the instruction to read Andrade's dialogue, add the following: "REMOVE INVESTIGATION AREA TOKEN #1 FROM THE TILE". -
† Pile of Refuse IN.4 – P.113
The clue token mentioned here should be #3 and not #1.
Chapter #20
- ‡ E.2 – P.141
There should be another way to enter the kitchen without requiring Animalism. Add the following instruction among the available choices:
"IF YOU HAVE THE “DOG WHISTLE” #2 ITEM CARD,
Surreptitiously blow the whistle and sneak into the kitchens while the dog is momentarily distracted.
READ E.5 - ‡ Zimmer: D.13 – P.18
The instruction refers to the wrong Action Token. It should read: "REMOVE ACTION TOKEN #2 IF IT IS ON THE TILE." - † E.1 – P.140
An instruction is missing if you do not want to interact with Zimmer after activating ACTION TOKEN #1. Add the following at the bottom of the page:
"Or, Indicate to the barkeep you’ll come order later and step away from the counter. RESUME PLAYING" - † Zimmer: D.8, D.10, D.12 – P.13, 15, 17
To avoid a loop, add the following instruction before the RESUME PLAYING on these pages:
"REMOVE ACTION TOKEN #1" - † Waitress: D.5, D.6 – P.114, 115
There is no need for this clue token in this chapter. You can ignore the "TAKE CLUE TOKEN #3" instruction.
Chapter #21
- † E.12 – P.63
The consequence here is a little too light. Instead of taking the LOOSE ENDS card immediately, use the following instruction:
"IF YOU HAVE USED THE BITE COMBAT CARD OR ANY DISCIPLINES DURING THIS COMBAT, A MASQUERADE BREACH OCCURS, OTHERWISE TAKE THE "LOOSE ENDS" #69 EFFECT CARD" - † Storybook: Introduction – P.79
The Initial setup shows Action Token #1 and #2. These should not be there. Remove them. They are set up later in the chapter. - † Storybook: Conclusion – P.80
The part of the conclusion that teases the next two chapters is missing. You can refer to the conclusion of Chapter 22, on page 82 to fill in the blank. Read from the 2nd paragraph onward, "And indeed, the next night..."
Chapter #22
- † E.1 – P.40
The round tracker must be set to 10, not 1. - † E.37 – P.76
The standee number for the Old Priest NPC is missing in the instruction. It should be #90.
Chapter #25
- † E.16 – P.19
An instruction showcasing the scenario BOSS' power is missing. Add the following after setting him on the tile, but before combat begins: "MOVE EACH CHARACTER AND ALLY 3 HEX AWAY FROM THE BOSS." (Name of the boss changed to BOSS here only to avoid spoilers) - † E.25 – P.28
It is unclear which deck this new, special BOSS is using. After setting him on the tile, add the following instruction: “MIX THE SHARED BOSS AND BOSS #8 COMBAT DECKS TOGETHER.” - † E.17 – P.20
The instruction to get rid of your effect cards is missing. At the top of the page, add the following: "DISCARD THE FOLLOWING EFFECT CARDS IF YOU HAVE THEM: 'APEX PREDATOR' #81, 'THERE’S SOMETHING IN THE WATER' #82, 'CRISIS OF FAITH' #83, 'FALLEN ANGEL' #84, 'ROOT OF ALL EVIL' #85, 'WITCH HUNT' #86.
Chapter #26
- † Caleb D.1 – P.18
The blood given to you by Caleb should also remove some of your hunger. Add the following instruction after recovering damage and willpower: "DECREASE YOUR HUNGER TRACKER BY 2". - † E.17, E.21, E.23, E.29 — P.70, 74, 76, 82
The Effect card given here is wrong. It should be "MARK OF THE SABBAT" #89 - ‡ E.62 — P.115
The location of Action Token #2 is missing. Place it anywhere adjacent to a difficult terrain token.
Chapter #27
- † Storybook: Introduction – P.91
Without spoiling anything, this chapter is a rare instance in which going into frenzy could resume in not removing a character from the tile for various reasons. As such, add the following instruction: "IF YOU ENTER FRENZY DURING THIS CHAPTER, DO NOT REMOVE YOUR CHARACTER. KEEP PLAYING, BUT YOU CANNOT USE THE BLOOD ANYMORE UNTIL THE END OF THE CHAPTER." -
† Storybook: Introduction – P.91
Both Rhodes and Jacob should have a speech bubble on the setup as they are both dialogue NPCs.
Chapter #28
- † E.5 – P.94
The instruction refers to the wrong NPC. It should read: "READ "YUMA" DIALOGUE D.1" -
† Melkiah D.5, D.8, D.11 – P.58, 61, 64
The “THE “MELKIAH” NPC CAN NO LONGER BE INTERACTED WITH” should not be on these pages. Feel free to ignore it.
Chapter #29
- ‡ Storybook: Introduction – P.99
Do not set up Investigation Token #2 as shown, it appears later on in the chapter. - † E.4 – P.55
Add the following instruction at the top of the page: “REMOVE ALL CHARACTERS WITH BLOOD SORCERY FROM THE TILE”. -
‡ IN.2 – P.47
Change the first choice requirements to: “IF YOU HAVE CLUE TOKEN #1 OR #2”.
Chapter #30
- ‡ Storybook: Introduction – P.101
The clue tokens gained in the previous chapter lead to the wrong pages. It should read:
"IF YOU HAVE CLUE TOKEN #1, you have climbed up the building thanks to your sorcery.
DISCARD IT AND READ EVENT E.1
• IF YOU HAVE CLUE TOKEN #2, ride the platform to the top.
DISCARD IT AND READ EVENT E.3
• IF YOU HAVE CLUE TOKEN #3, you have used Sid's card to ride the elevator.
DISCARD IT AND READ EVENT E.4
• IF YOU HAVE CLUE TOKEN #4, brute force your way through more of the Prince's security.
DISCARD IT AND READ EVENT E.2" - ‡ Storybook: Conclusion – P.102
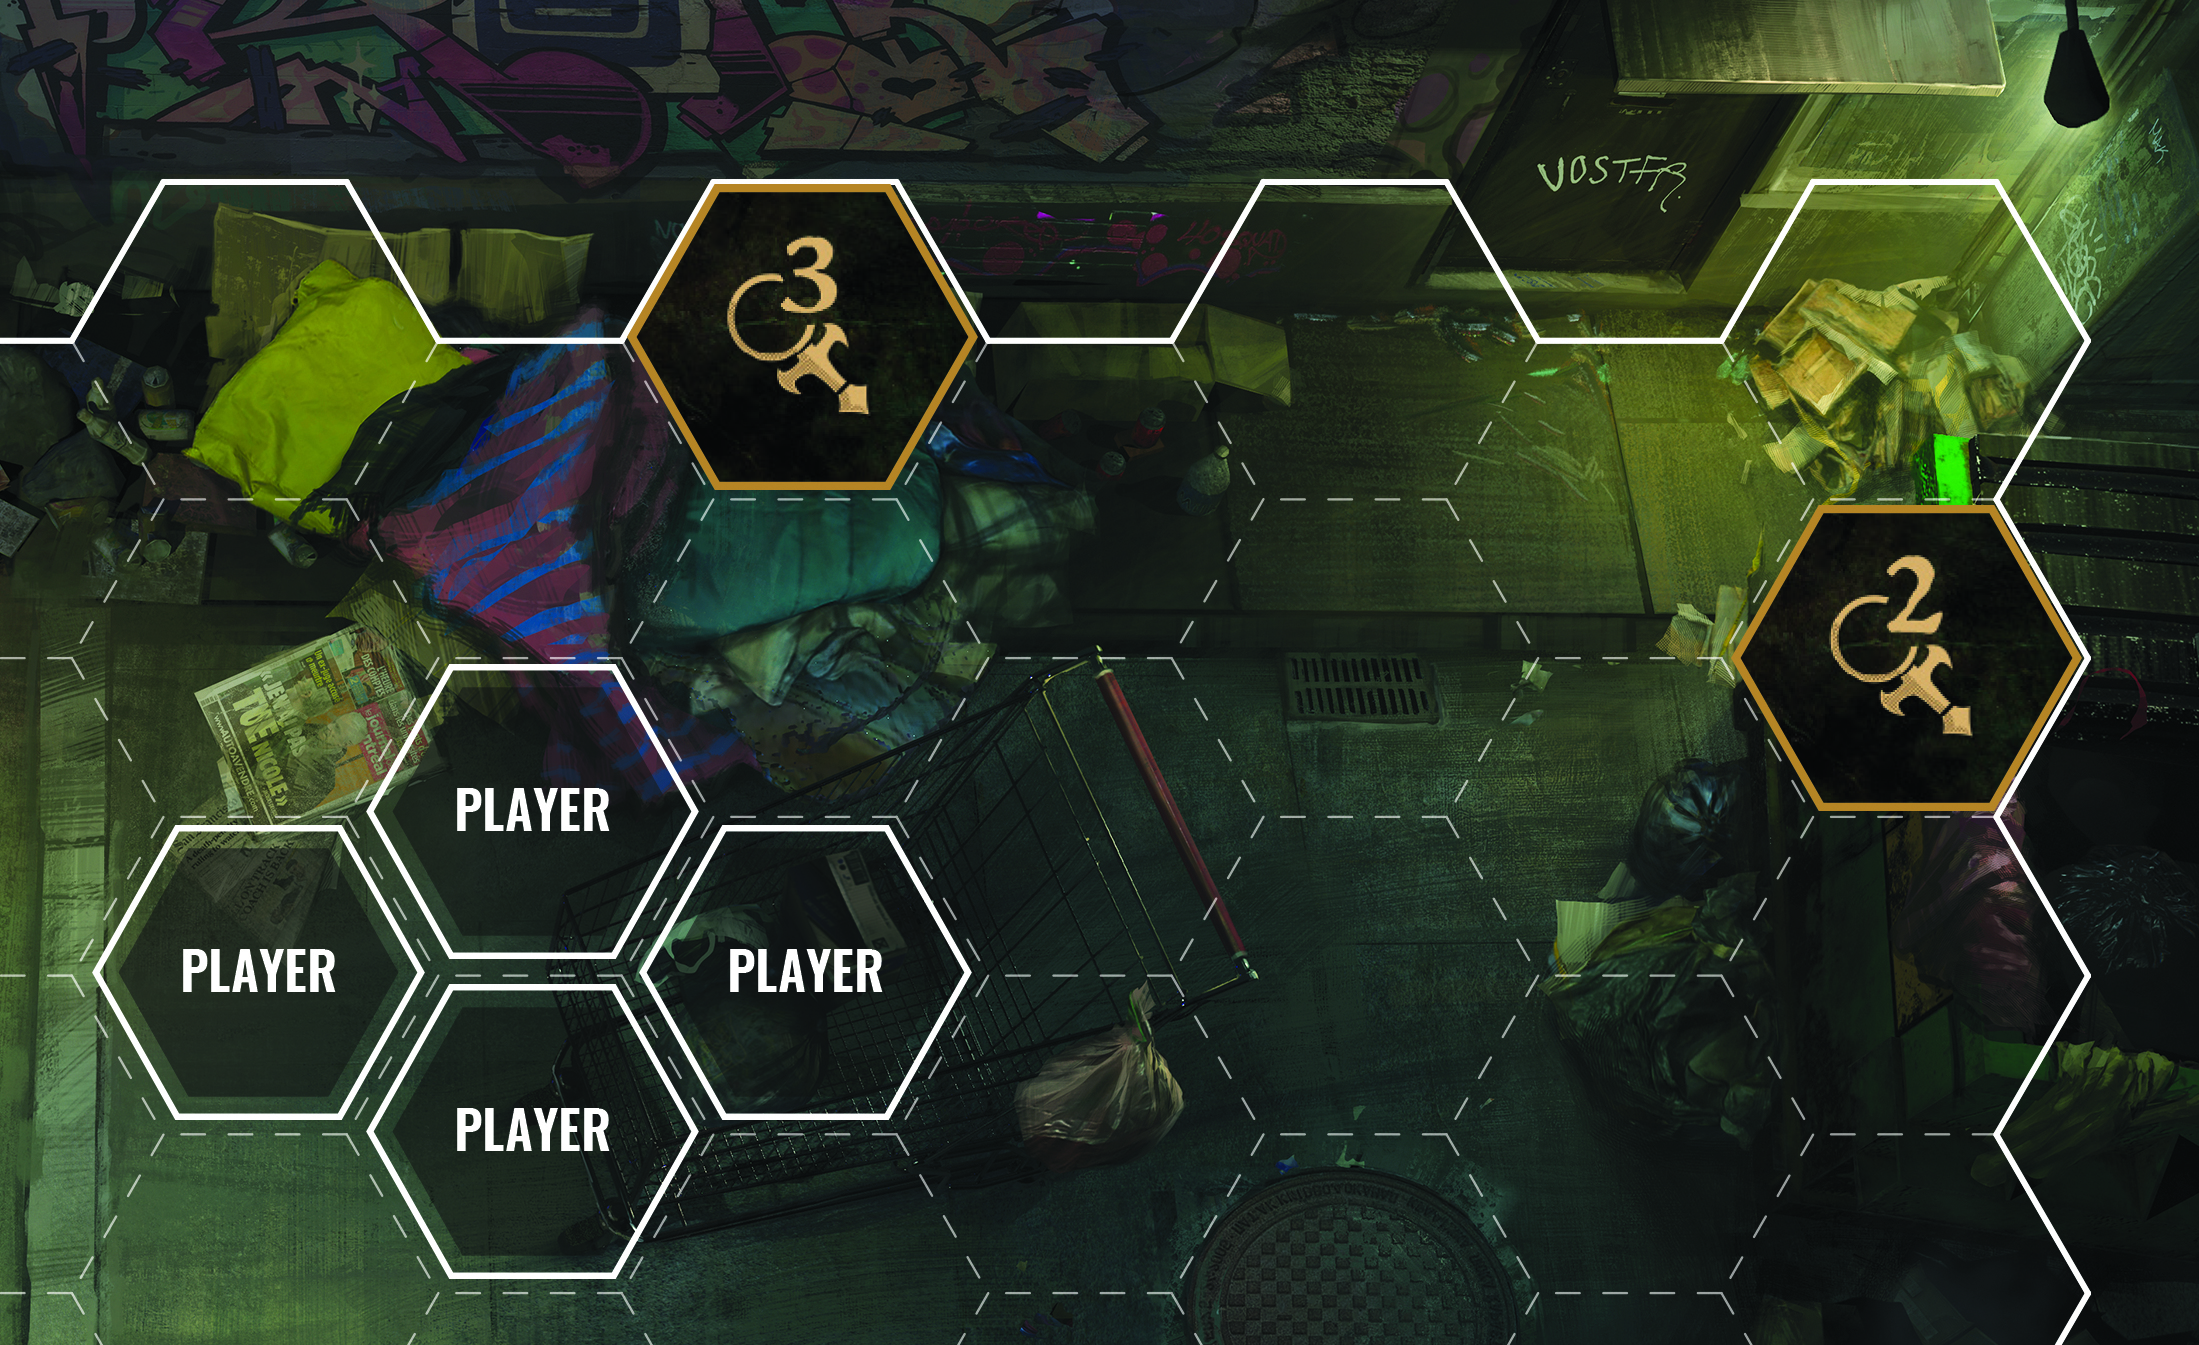
An instruction is missing regarding a special mission you have to perform for another Kindred. Add the following instruction after gaining the chapter's reward: "IF YOU HAVE THE “VAMPIRE”S OATH” #73 EFFECT CARD AND INVESTIGATION AREA TOKEN #1 IS STILL ON THE TILE, TAKE THE “MORE THAN YOU BARGAINED FOR” #78 EFFECT CARD" - † E.1-E.3-E.7-E.25-E.66, pages 26-28-32-50-91
The "Powerful Guard" NPC standee number is missing on these pages. Add "#9" after each mention of THE “POWERFUL GUARD” on these pages. - ‡ E.3 – P.28
The image is missing an element. Action Token #4 should be placed according to the image below.
- ‡ E.7 & E.8 – P.32, 33
The action tokens are missing from the image. They should be set up according to the image below.
- ‡ E.10 – P.35
The action tokens are missing from the image. They should be set up according to the image below.
- † E.33 – P.58
It should read: "SET ACTION TOKENS #1, #2, #3, AND #4 (ALL PHASE II) ON THE DESIGNATED HEXES". It is currently missing the Phase II part. - † E.35 – P.60
It should be INVESTIGATION AREA TOKEN #1 and not #3 that needs to be set up here. - † E.43 – P.68
The STEALTH check should be accompanied by the phrase: "Quickly dash out of there", and the OBFUSCATE use should be accompanied by the phrase: "Trust in the Blood to keep you hidden." - † E.45 – P.70
The NPC shown in the image should be looking the other way. Rotate him so that his facing arrow points left.
- ‡ E.66 – P.91
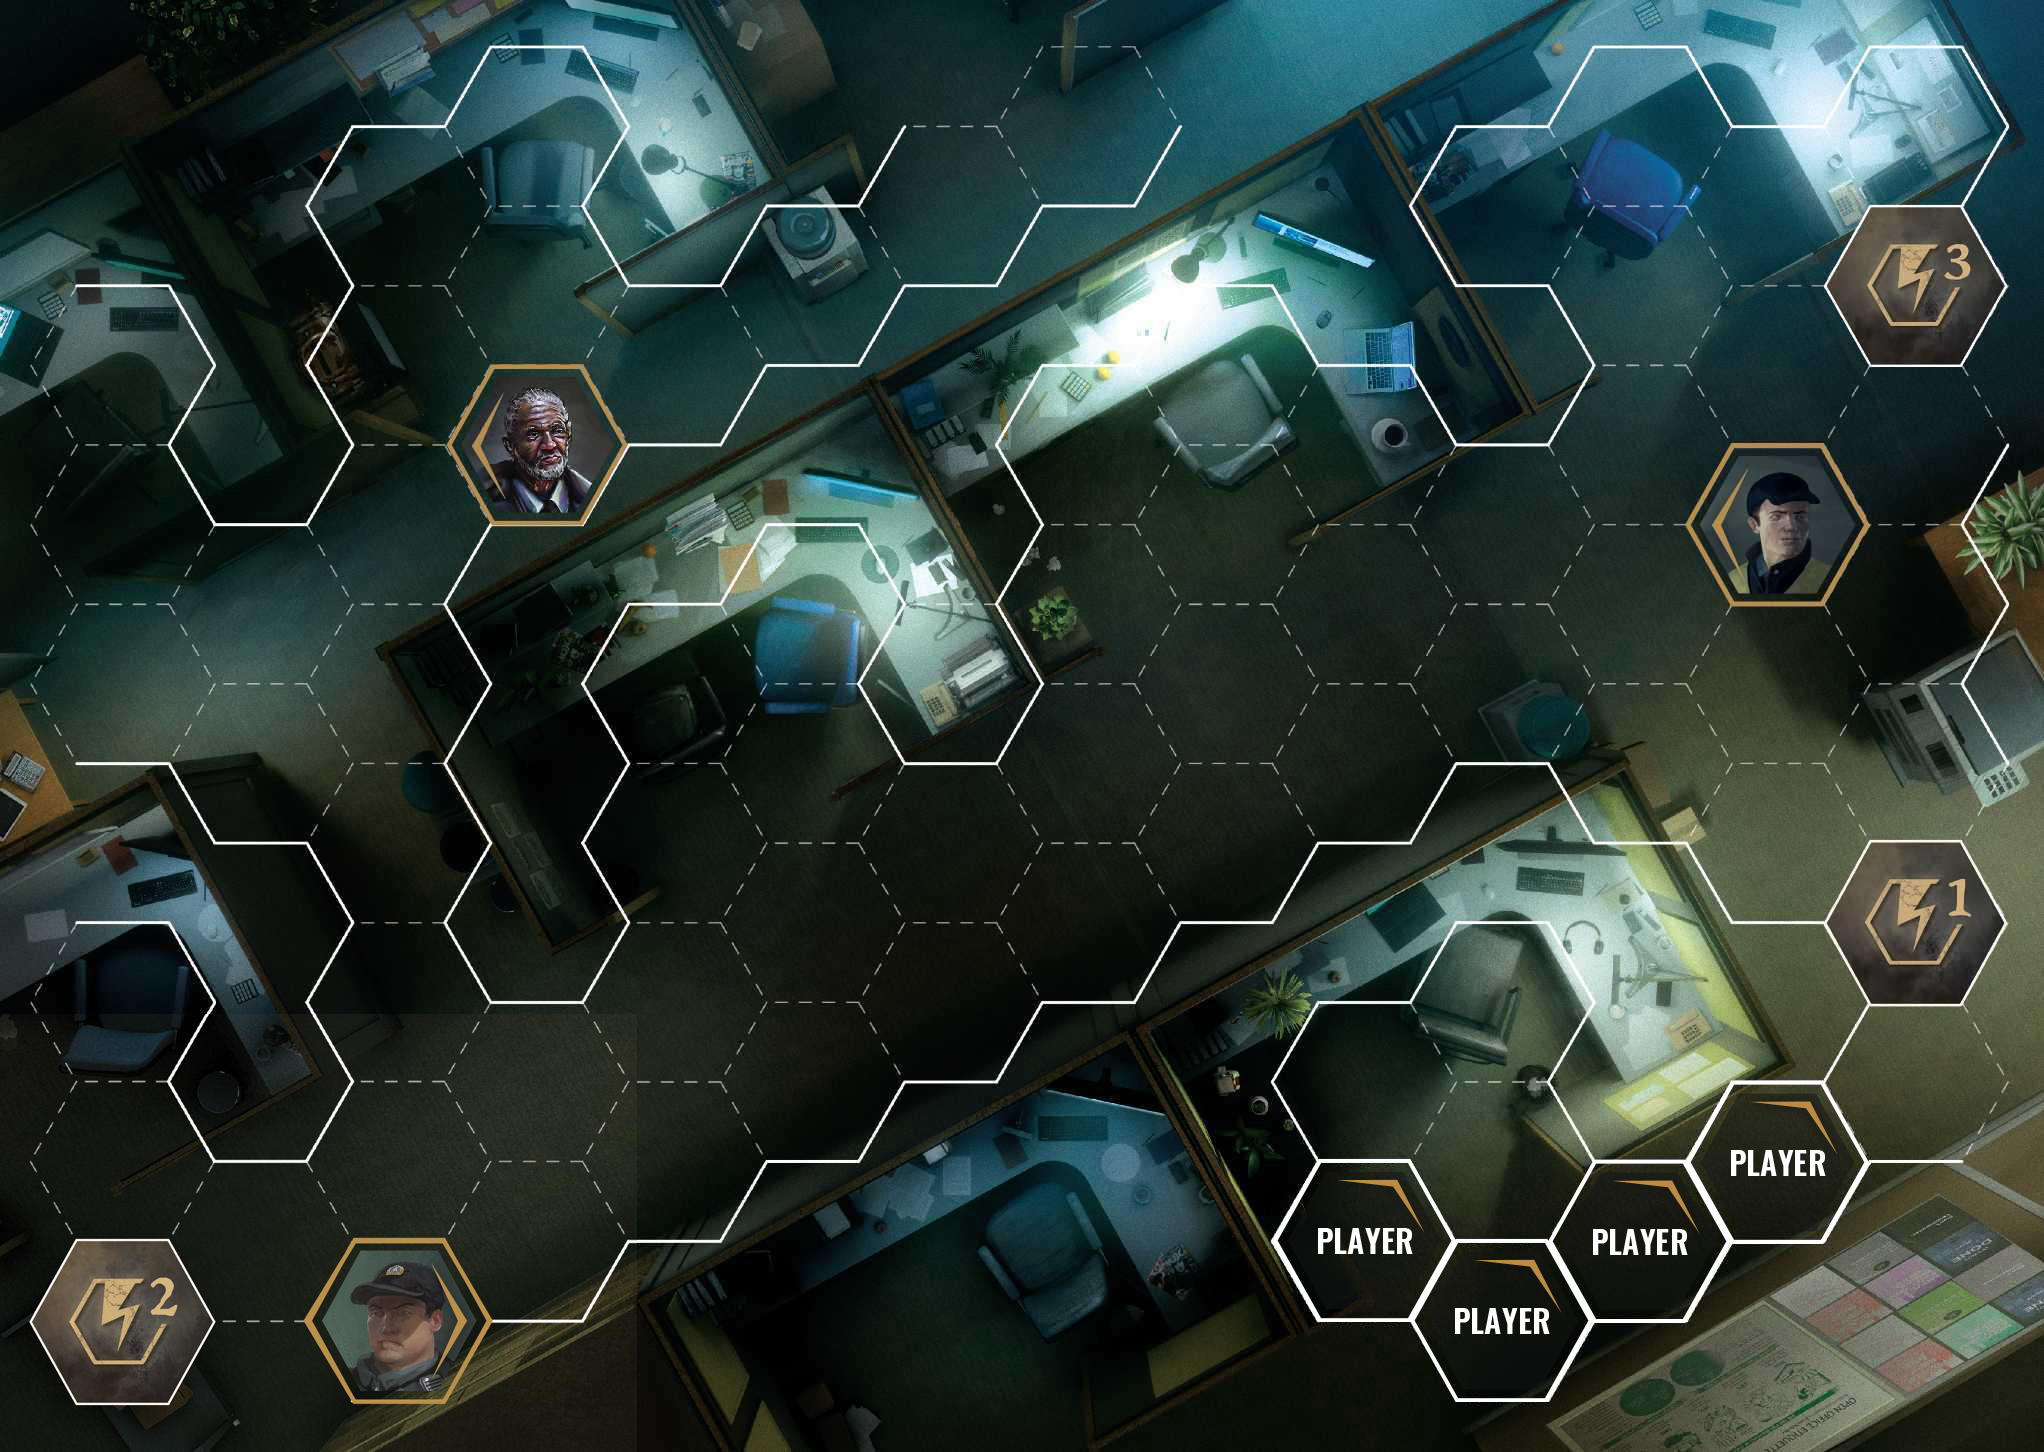
The players are missing from the image. They should be set up according to the image below.

Chapter #31
- ‡ E.12 – P.67
All of the tokens here should be investigation area tokens. The instruction should read: "SET INVESTIGATION AREA TOKEN #1, #2, #3 ON THE DESIGNATED HEXES"
Chapter #32
- ‡ E.55 – P.84
The players' starting location is missing. It should be as shown on the image below.
- ‡ E.63 and E.64 – P.92-93
An Instruction is missing. Add: "SET THE 'SYLVESTER' NPC ON A HEX ON THE LEFT EDGE OF THE TILE" before the "COMBAT BEGINS!" instruction. -
† IN.2: D.19 – P.20-21
The instruction should say: “REMOVE INVESTIGATION AREA TOKEN #2” and not “ACTION TOKEN #3”.
Chapter #33
- † Nyaya D.29 – P.104
The first choice, the one requiring the TONGUE OF JARTHIS, should not exist. Ignore it. - † Melkiah D.5 – P.20
An instruction is missing. After making a Rouse check, add the following instruction: "GAIN 1 INVESTIGATION SUCESS TOKEN" - † Storybook: Conclusion – P.108
Remove the instruction: "DO NOT REGAIN YOUR HUNGER, WILLPOWER, OR MEND YOUR DAMAGE"
Chapter #35
- † Betty D.1 – P.30
The last option should appear first, and should read: "IF YOU HAVE THE “HARROWED HERALD” #93 EFFECT CARD, YOU MUST READ D.5"
Chapter #38
- ‡ Lectern, IN.1 & E.1 – P.34 & 44
The first choice should read: "IF YOU DO NOT HAVE THE "PAWNED" #92 EFFECT CARD"
Chapter #39
- ‡ Lectern, IN.1 – P.24
This instruction gives the wrong clue token. It should be: "TAKE CLUE TOKEN #2".
Chapter #40
- † Jimmy, D.5 – P.10
When combat begins, add the following instruction: "THE “JIMMY SMYTHE” NPC USES THE “JIMMY SMYTHE” #48 STATE CARD"
Chapter #41
- ‡ E.37-39 – P.42-44
The instruction here asks for the wrong effect card. it should read: IF YOU DO NOT HAVE THE “CAST OUT” #95 EFFECT CARD.
Banu Haqim #1
- † Storybook: Introduction – P.151
In the ACTION section, add the instruction: "Take the "MY OLD FRIEND" #67 item card" before "READ PAGE E.1". It is stated in the narrative introduction that you have your gun, but without the instruction, we realize it might not be obvious. You still do not have the KARAMBIT, this comes later. - † E.15 – P.56
At the top of the page, add the following instruction: "Move your miniature on a HEX facing the "Ticket Booth Operator" NPC". It feels weird to shout at the operator from across the room otherwise.
Banu Haqim #2
- ‡ Storybook: Introduction – P.153
Remove Investigation Token #3 from the tile during the chapter's initial setup. It appears later in the chapter. - † E.4 – P.67
Instead of reducing your Hunger by 1, reduce it by 2, just like you would a Prey NPC.
Hecata #1
- † E.4 – P.51
Add the instruction “Read E.6” at the end of the second option: “If you have Fortitude...”
Hecata #2
- † Clarence Bleaker: D.19 – P.36
To follow the narrative, Clarence should be removed from the tile before you resume playing. Add the following instruction after the round tracker is set: "REMOVE THE CLARENCE BLEAKER NPC FROM THE TILE" - ‡ Charlotte Milliner: D.1 – P.6 and Mikael, D.6 – P.61
You do not need both clue tokens, only either. Change the instruction to: "IF YOU HAVE CLUE TOKEN #1 OR #2" - ‡ Charlotte Milliner: D.1 – P.6
Add the following instruction before "Otherwise, READ D.2": IF YOU ARE ON TILE H-02 (Church Interior) READ D.6" - ‡ Charlotte Milliner: D.3 – P.8
This page leads to the wrong page. It should read: "READ EVENT E.12" - ‡ E.29 – P.102
Since Clarence joins you, he will not go and do that other thing he promised. Add the following instruction when combat begins: "REMOVE THE AUTHORITY TRACKER". -
‡ E.21 – P.94
An instruction is missing. Before “RESUME PLAYING”, add: “IF CLARENCE BLEAKER IS ON THE TILE, YOU MUST READ CLARENCE BLEAKER DIALOGUE PAGE D.23”
Lasombra #1
- ‡ Bas-Relief: IN.1 – P.66
Add the following instruction before RESUME PLAYING: "TAKE CLUE TOKEN #3". - † Bas-Relief: IN.2 – P.67
Add the following instruction after TAKE CLUE TOKEN #3: "TAKE THE VIGILANT #37 EFFECT CARD". - † The Door – P.69
There is no need for the "IF THE ACTION TOKEN #2 IS ON THE TILE" instruction. You can ignore it. - † E.4 – P.77
There is no need for the "IF THE ACTION TOKEN #1 IS ON THE TILE" instruction. You can ignore it. - ‡ Canvas on Easel: IN.1 – P.62
The wrong clue token is given. It should read: "TAKE CLUE TOKEN #2". -
† Stored Paintings, IN.1 – P.58
The wrong clue token is given. It should read: “TAKE CLUE TOKEN #1”.
Lasombra #2
- † Storybook Introduction – P.161
The Action is spoiler-y, it should only read: "READ E.1" - ‡ E.2 – P.45
This page leads to the wrong page. It should read: "READ E.9", as E.10 is the second part of E.9 and only contains the image, not the instruction. - ‡ E.4, page 47
An instruction is missing. Add the following at the end of the narrative text: "TAKE CLUE TOKEN #1". - ‡ E.38 – P.81
The instruction allowing you to do more with the mirror is missing. Add the following instruction at the end of the narrative block: "IF THERE ARE 2 INVESTIGATION AREA TOKENS OR FEWER LEFT ON THE TILE, YOU MUST READ PAGE E.39"
Ministry #1
- † Storybook: Conclusion – P.164
While you cannot visit Alex or undertake any feeding event because you are not in Montreal, you should be able to regain your Hunger, Willpower, and Damage. Change the instruction for: "BETWEEN THIS CHAPTER AND THE NEXT: YOU CANNOT CHANGE YOUR ALLIES, NOR VISIT ALEX SIMARD, NOR UNDERTAKE A FEEDING EVENT."
The Hollow
- † Vicious: E.3 – P.56
Replace the first half of the instruction with: SET A DIFFICULT TERRAIN TOKEN ON THE UPPER LEFT ADJACENT HEX TO YOUR STARTING LOCATION.
-
† Vicious: E.3, E.5, E.6 – P.58-59
These instructions do not follow Sid’s tracker on his state card. You should read the event pages only when Sid’s damage tracker is 4+ (E.4), 8+ (E.5), and 12 (E.6).
Ancient Paths #1
- † Enzo: E.1
Enzo should use his own State Card, not the "Frenzied Vampire" despite certain circumstances...
Ancient Paths #2
- † Councilwoman: D.11 – P.16
The "MAINTENANCE WORKERS" NPC that is set up on this page is indeed a dialogue NPC, and the image shown on the page should have the speech bubble to indicate that. - † E.13 – P.68
The setup of investigation token #4 is missing. When you add the 3 NPCs, also set Investigation Token #4 in the top left corner, as indicated in the image here.
- † Storybook – P.2
The title of the chapter reads "Here be Monsters", but its real name, as written on the booklet cover, is "A Macabre Discovery ".
Obscure Past #2
- ‡ Storybook: Introduction – P.147
Remove the Investigation Area Tokens from the initial setup, they appear later. Also, Yuma is not a dialogue NPC here yet, unlike what is shown on the image.
Feeding Events
- † Hochelaga: #6 – P.16
The "SWITCHBLADE" is item #51 and not #53.
- † Westmount: #7 – P.106
The BEAUTIFUL STATUE is item #63 and not #68.
Cards
Character Boards
- Nico Miller
The back of the board calls Nico's sire Phillippe Charest, but his name is Phillippe Ducharme.
Combat Cards
- † Abyss Hunger, Oblivion 3
The added effect should state: "NPCs in Line of Sight" instead of "Targets..." You do not have targets when defending, but the slowing effect is intended to affect every NPC you can see.
Discipline Cards
- † Dominate - Compel level 3 — "Mesmerize"
Add the line "in your Line of Sight" after "Choose an NPC". - † Celerity level 1 — "Fleetness"
There is no point in limiting this Discipline to only during combat. Change the duration to "Effect ends at the end of the sequence." - † Blood Sorcery - Quietus level 2 — "Corrosive Blood", Oblivion - Obtenebration level 2 — "Stygian Shroud", level 3, — "Tenebrous Form"
The duration should not be "Discard after usage" but "Discard at the end of the combat sequence", to remain in line with other similar Disciplines.
- † Presence — All levels
The Discipline power DREAD GAZE should be level 1, and ENTRANCEMENT should be level 2. - † Presence — Level 3, "Subjugate"
This power's duration should be "Immediate" and not "Active".
Effect Cards
- † Disoriented #61
The duration should be: "Discard at the end of the chapter."
Standees
- † Standee #126
There is no #126, that number was skipped over when we numbered the standees.
- † Standees #10 to #19
The NPC standees #10 to #19 have a numbering mistake. They bear #30 to #39 on their back. The real #30 to #39 NPCs have the same numbers on both sides. Those who have differing #'s are written as #10 to #19 in the storybook and booklets. In case of confusion, look to the image, or to the lowest number on the standee to correctly identify which are the right ones.
State Cards
- † Ghouls 1 to 4, #72 to 75
These ghouls should use the Ghoul Combat Deck, not the Human one. - † Werewolf Boss State Card #22
The Special attack #1 should be typed "attack" and not "defense". - † Sid State Card #26
All of Sid's special attacks are ranged attacks. Both his special attacks should target (Target in Line of Sight). His passive effect is also missing a component. Change it to the following: "WHENEVER SID IS DEALT DAMAGE BY A CHARACTER, PUSH THAT ATTACKER BACK 2 HEXES."
Rulebook
Combat Cards
- Page 45
The first paragraph is confusing. Replace it with: "At the beginning of a combat round, players must select one card from their active hand. If they do not have any cards remaining in their active hand, they recover all of their previously discarded combat cards. If you have played some (but not all) or your combat cards and want to recover your discarded cards and add them to your active hand, decrease your willpower tracker by 1 and draw them back. Combat Cards belong to one of 3 types mentioned below:" - Page 47
After the sentence: "Players may also recover all discarded combat cards by spending 1 Willpower point, regardless of how many cards have been discarded.", add: "Unless your entire Active Hand has been discarded, in which case you recover all of your discarded combat cards".
Experience Points
- Page 20
Replace the XP section with the following:
"Throughout the various chapters found within the game, you will collect several things: experience points (XP), items, clues, BOONS, and more. Record the XP you collect at the bottom of your character sheet. Any XP gained during the game is shared amongst all members of the coterie, unless specified otherwise, and among any character a player may play. This means that if you want to play as a different character during the campaign, your new character begins with the same amount of XP as your previous one. Note: Changing characters is permanent. If you change to a different character after Chapter #1, you cannot return to your previous character. The only exception to this are the Prologues. You can play each prologue once, and gain the XP for each.
Masquerade Breach
- † P.32
Clarification on when to open the envelopes. We realize it might not be obvious when to open the Masquerade Breach envelopes. As such, add the following right before the list of consequences to breaching the Masquerade: "When you complete a chapter, or feeding event, in which you increased the Masquerade Breach tracker, do the following depending on where the Masquerade Breach Tracker is at:"
Movement
- † P.35
Clarification on movement: A player character can move through another player character or Ally, but not end their turn on the same HEX.
Nico Miller
- † P.13
For ease of play, here are all the chapters in which Nico's flaw is active:
Chapters 3, 4, 14, 19, 20, 24, 27, 37, 38, 39, and Ancient Paths 1.
Note that these do not necessarily correspond to tiles - for example, Nico only suffers their flaw when they steps into the Hollow (Chapter 14) for the first time, not any other time after.
Skill Checks
- † P.34
This is a clarification for a fringe case that might happen during play. If a player attempting a skill check would end up with 0 dice or less (due to an effect card, or the Fatigued state), they automatically fail the check, even if they had enough skill levels to guarantee success.
Stealth Mode
- † P.50
Clarification on Stealth and enemy movement: It might happen, while you are in Stealth Mode, that an NPC moves in such a way that you end up in their Line of Sight. When this happens, you may attempt an immediate STEALTH check to hide. If you were already in STEALTH mode, you must make a new STEALTH check to remain hidden from view.P.50
Clarification on Stealth and enemy movement: It might happen, while you are in Stealth Mode, that an NPC moves in such a way that you end up in their Line of Sight. When this happens, you may attempt an immediate STEALTH check to hide. If you were already in STEALTH mode, you must make a new STEALTH check to remain hidden from view.
Tokens
- † P.29
Clarification: It costs 2 Movement to move on a Difficult Terrain token, and it costs 1 to move off of it. You can end your turn on a difficult terrain token.
† : Typo, oversight, clarification or improvement — Not game breaking. In most of these instances, players can figure the solution without this document.
‡ : Higher importance error leading to a dead-end or a wrong path.
Print it!
For the players who don't want to refer to the website during the game, we have compiled all the errata into a single PDF that you can print at home.
Found an error?
You've found an error in the game that is not listed here? Please use the form to inform the FLYOS team. This helps the whole community of players!
Your questions answered
This is the official FAQ for CHAPTERS. We’ve put together some commonly asked questions to give you more information about the game and how it plays. It will be continuously updated as more questions are added and existing answers are clarified.
Be part of the journey
Be part of the journey
Join the 6500+ members of Vampire: the Masquerade — CHAPTERS group and let's start the conversation. Share your experience, ask questions to the community and be part of the adventure.
Join the 5000+ members of Vampire: the Masquerade — CHAPTERS group and let's start the conversation. Share your exerience, ask questions to the community and be part of the adventure.
Join the 5000+ members of Vampire: the Masquerade — CHAPTERS group and let's start the conversation. Share your experience, ask questions to the community and be part of the adventure.
Join our mailing list!
Join our mailing list!
Join our mailing list!
Don't miss the different annoucement of the game or all the reminder about its next editions. No spam and no share of your information to any third party.
Don't miss the different annoucement of the game or all the reminder about its next editions. No spam and no share of your information to any third party.
Don't miss the different annoucement of the game or all the reminder about its next editions. No spam and no share of your information to any third party.
Flyos Games inc. © All rights reserved — 2023
Vampire: The Masquerade is the copyright and trademark of Paradox Interactive AB. All rights reserved. For more information please visit www.paradoxinteractive.com.
Flyos Games inc. © All rights reserved — 2023
Vampire: The Masquerade is the copyright and trademark of Paradox Interactive AB. All rights reserved. For more information please visit www.paradoxinteractive.com.
Flyos Games inc. © All rights reserved — 2023
Vampire: The Masquerade is the copyright and trademark of Paradox Interactive AB. All rights reserved. For more information please visit www.paradoxinteractive.com.
Flyos Games inc. © All rights reserved — 2023
Vampire: The Masquerade is the copyright and trademark of Paradox Interactive AB. All rights reserved. For more information please visit www.paradoxinteractive.com.